Wednesday, 6 May 2015

May Moodboard page - Leonie


Hey folks, hope today finds you all well and perhaps managing to squeeze some scrapping time into your schedule somewhere?!  
Perhaps you could play along with us and our May Moodboard created by Anita Bownds, it is just so pretty and sweet. 
 I loved creating with this board.


Here's the page I made and I used the Amy Tangerine - Rise and Shine Collection
available in the Store HERE


The Rise and Shine collection has lots of bright yellow and pink patterned papes 
which suited the board perfectly.  All I need to do was add some of the brighter blues from the board, which I did by creating a background using mostly the 
Cobalt Blue Color Bloom Spray by Prima.
I also added some yellow to the background with various stencils.


I used some cool transparent stickers for contrast from the I Am - Simple Stories collection.
See the phrase sticker here and the black hearts on the background.


The title letters are from the Simple Stories - Snap - Life Documented range. 
These are one of my favourite alphas to use at the moment, there are 8 different colours in the pack!


Thanks for dropping by today.
happy creating!
Leonie.


Click on the links below to see all the products I used from the Sassy Store.

Rise and Shine Claire Paper 12x12 Rise and Shine Ella Paper 12x12 Rise and Shine Kylie Paper 12x12


Sn@p Life Documented Letter Stickers 856pkPrima Color Bloom Sultry Shimmer Cobolt     I AM Photo Stickers
Photobucket

Tuesday, 5 May 2015

May Guest Designer - Leeann Pearce

Hello, My name is Leeann Pearce and I'm happy to be May's Guest Designer for Sassy Scrappers. I've been playing with paper and glue for a long time now and I still love it. I did have a wee break as we sold our farm in Western Australia and relocated our family to Drouin -Victoria. That road trip was all kinds of awesome as we took our time coming across and traveled this amazing country! sometimes I wish we were   still on the road... it really is WOW! 
I have my own style of scrapbooking being a little random and artsy, it's also playful at times. Watercolor paints, layers, doodles, repeated random stamping and lots of tiny cute embellishments are totally me. And here are a couple of pages I whipped up using lots gorgeous supplies from the 
Sassy Scrappers Store.
"Here's the story"


Supplies: Amy Tangerine Stitched - BOBBIN  Rise and Shine EMMA CHIPBOARD FRAMES EPOXY STICKERS  MAMBI Geometric Friends Glitter stickers Simply Stories I AM WOOD VENEER   Geometric Trianges Washi Tape

Thanks so much for visiting today, I will have another layout next week for you, so please come back and have a look...Leeann.

Photobucket

Monday, 4 May 2015

Project Life | Extra Pocket Inserts...

Hello Sassy Friends! Today I am trying something a little different to my normal Project Life 2015 style. So far this year I am very happy to stay with my tried and true Pocket Page design A format.  With this design in mind, I have a fair idea of what photos to capture during the week and where they will fit into my spread.  But what happens when you have an event that extends from the last few days of one week and then into the first few days of the next? This is what happened to me recently when I attended the E2C retreat with Leonie & Chantalle!
 
My dilemma was simply due to the fact that I didn't want to have this event spread across four project life pocket pages.  In Week 11 and Week 12, I still had things happening at home on either side of my trip away. And I had way too many photos not to add to my PL2015 story.
 
Enter Becky Higgins Design J pocket pages.
 
 
With this smaller version of pocket page I have managed to successfully squeeze two weeks together, especially when it is inserted between my spread for Weeks 11 & 12 using Design A.
 
Design J was also ideal to share my trimmed down Instagram photos. It features pockets both 4x4 and 3x4 in size.
 

And when the Instagram photos are teamed up with gorgeous 4x4 designed patterned paper square from Dear Lizzy Fine & Dandy, everything just falls into place!

The pocket page design is only 7" wide and in this single page I have managed to include 18 photos on both front and back. Admittedly, I also put together a few collage shots via my iPhone before printing them out.


On the front of the insert, I have created a journaling card by typing a few words onto white cardstock and then embellishing the reverse side of the Dear Lizzy 4x4 patterned paper.  The embellishments used are from Crate Paper Poolside cardstock die-cuts and Simple Stories I Am Enamel dots.


The same idea above, applies to the middle section of the insert. The word "together" was fussy cut from the Amy Tangerine Rise and Shine Lana paper.


Each section of the pocket page design, has been treated like a mini double spread. Photo + Story.
 
 
On the reverse side of the insert, I've indulged with more of the gorgeous Dear Lizzy Fine & Dandy and Crate Paper Poolside.
 
 
Once again, I've created using the idea that each section of the pockets are a mini double page spread which has helped me colour coordinate and create a cohesive look across the entire spread.
 
 
For my title pocket, I have only added the month.  The dates of both Weeks 11&12 are included on the full page Design A pockets. These alphas are new in store from Elle's Studio.  I love the woodgrain look!


The coordinating embellishments are a lot of fun to layer and play with but I also had to try out the new ombre ink pads from Hero Arts. The arrow stamp, shown below, has been created with a clear Kaisercraft stamp and the Butter to Orange ink pad.
 
 
To finish off the pocket page insert, I added a collage Instagram sized photo of a birthday dinner we attended. The ombre pink die-cut opposite the photo repeats the colours found in the photo, as does the black and white patterned paper beneath.
 
 
Thanks for joining me here today as I step outside my comfort zone and start to combine weeks together and hopefully keep my PL2015, making sequential sense!!!
 
Sassy Supplies:
 
https://www.sassyscrapper.com.au/index.php?route=product/product&path=256_392_1151&product_id=9621
 
https://www.sassyscrapper.com.au/index.php?route=product/product&path=256_519_1150&product_id=9571
 
https://www.sassyscrapper.com.au/index.php?route=product/product&path=256_519_1150&product_id=9558
 
https://www.sassyscrapper.com.au/index.php?route=product/product&path=256_519_1150&product_id=9557
 
https://www.sassyscrapper.com.au/index.php?route=product/product&path=256_653_1120&product_id=9060
 
https://www.sassyscrapper.com.au/index.php?route=product/product&path=256_392_1139&product_id=9250
 
https://www.sassyscrapper.com.au/index.php?route=product/product&path=256_745_1128&product_id=9128
 
https://www.sassyscrapper.com.au/index.php?route=product/product&product_id=9366&search=hero+arts+ombre
 
Photobucket

Sunday, 3 May 2015

New Challenge - May 2015 and A Guest Designer

Happy Sunday Scrappy Friends..  I hope you have had a wonderful weekend and have had time to relax..
We have been busy over at Sassy Headquarters getting another amazing Challenge ready for you to play along with..
Take a look at our New May Moodboard Challenge (designed by Anita Bownds)

Arents those colours and elements just so beautiful???

And here is Inspiration from our talented DT Girls


Anita Bownds
Leonie Neal Dawson
Chantalle McDaniel
We really hope you come and play along with us this month..
We are also very excited to introduce our fabulous Guest Designer this month,  the ever so talented Leeann Pearce
Please make sure you pop over to the blog on Tuesday and meet Leeann and read her story and also see an amazing layout Leeann has created for us...

I will be back earlier in the week to announce the winner of the April Challenge and also the winner of our Minc...

Stay tuned
Happy Scrapping

Olga..xxx
Photobucket

Friday, 1 May 2015

Gifts for Mum

Hello Sassy Friends and happy 1st of May!

Brrrr, I must be getting a touch softer, as I am certainly feeling the cold snap we are having up here in Brisbane. I'm missing the balmy evenings already!

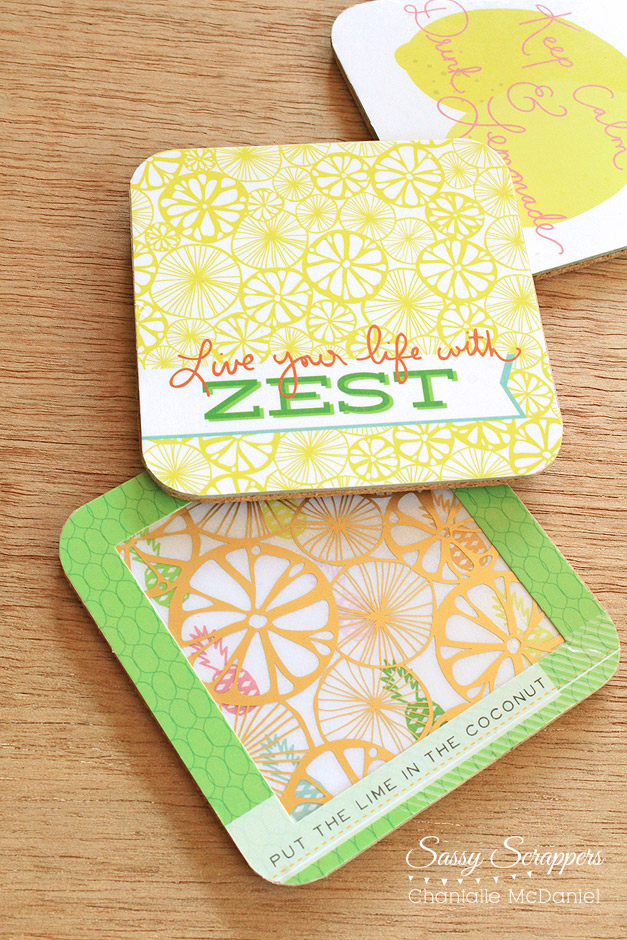
The juicy new Citrus Bliss collection from Pink Paislee is making me miss Summer even more. Luckily, I can get a dose of sunshine with every sip and you can too, as I show you how to make some gorgeous coasters you can whip up for a gift (Mother's Day is just a few days away!) or keep for yourself ;)

It all started when I opened my pack of Citrus Bliss Instagram Cards. The shape, the size and the some of the fun drink-inspired sentiments were just shouting out to be made into something for the table.

It just so happened that I found a near perfect size pack of coasters/pot holders from my local discount store for about $3! I used my WRMK Corner Chomper to round the edges.


Next, I adhered my Instagram cards to pieces of lightweight chipboard, cut down to roughly the same size. Make sure your adhesive (I used Helmar 450 Quick Dry) is as close to the edges as possible so it seals up nicely. Trim off the excess chipboard.


I have used an acrylic card layered on top of a paper card for two of the coasters. Acrylic can be a tricky thing to stick down as the adhesive usually shows. I recently discovered some fabulous Adhesive Transfer Sheets from Scrapbook Adhesives - which we will hopefully be stocking very soon!

They are awesome, you simply peel back the protective backing paper, lay your item on top of the adhesive, give it a good rub and then peel your item off slowly. It gives an even coat of adhesive all over, so you don't have any glue showing through, which is fantastic for clear items!

Above: The acrylic card shown on the adhesive transfer sheet. I simply peeled it off and then adhered it my cardstock card.

Here is a demo video from my Instagram feed @chantallemcdaniel


Once I had prepared my cards onto chipboard, I went ahead and adhered them to the base cork layers. The size of the cork was slightly larger than the paper, so I trimmed off the excess with a sharp craft knife and then rounded the edges with a sanding block. The sanding really made a difference to the finish, as it smoothed the edges beautifully.


 Lastly, I covered the top of the coasters with a layer of clear contact. Make sure to smooth out any air bubbles. This gives them a water resistant finish.


Have fun mixing different cards to create custom layers!


Make Mum's day by serving her a tasty glass of yummy fruit infused water 


or if you want to spice it up a bit...

 
Cheers!

Chantalle

 
 Citrus Bliss Instagram Cards 4"X4" 24/Pkg


09 10