Monday, 11 May 2015

Project Life | Week 13...

Hello Project Life Fans! Today on the blog I am sharing my PL2015 Week 13 spread.  Otherwise known as - Easter!
 
 
This week I am playing with the gorgeous Amy Tangerine Rise & Shine collection, Dear Lizzy Fine & Dandy, and little pieces of ephemera from Crate Paper.
 
 
My title pocket for Week 13 takes advantage of the white space below a photo collage. Jillibean Alphabeans (tart teal) pick up the colour from other elements on my spread, as does the gold foil leaf embellishment.
 
 
My "Week In Review" journaling was printed onto white cardstock and balanced in the 4x6 pocket with layers of Crate Paper Craft Market ephemera.


To repeat the look of the title pocket and to create cohesion, I added a Simple Stories cardstock sticker to the white space of a second photo collage.  Its colour mimicking the title of this spread.
 
 
On page two, I wanted to be able to instantly recognise this PL spread as representing Easter 2015.
 
 
In place of excessive journaling, I simply added a few sub titles such as "egg hunt" and "Easter 2015".


I've also kept the colours on these pages, fresh and reminiscent of Easter. It's no longer Summer and the weather is starting to cool.  The pink bunny die-cut from the Craft Market ephemera pack was also ideal to add to my spread.  Thanks for visiting..x
 
Sassy Supplies:
 
https://www.sassyscrapper.com.au/index.php?route=product/product&path=256_392_1151&product_id=9621
 
https://www.sassyscrapper.com.au/index.php?route=product/product&path=256_519_1150&product_id=9571
 
https://www.sassyscrapper.com.au/index.php?route=product/product&path=256_519_1150&product_id=9558
 
https://www.sassyscrapper.com.au/index.php?route=product/product&path=256_519_1150&product_id=9557
 
https://www.sassyscrapper.com.au/index.php?route=product/product&path=256_653_1120&product_id=9060
 
Rise and Shine Rachel Paper 12x12
 
Craft Market Ephemera 89pk
 
I AM Expressions Cardstock Stickers 12x12
 
Jillibean Soup Tart Teal Alphas
Photobucket

Friday, 8 May 2015

Sweet Treat for Mum

Hello again Sassy friends! I hope this week has treated you well!

If you're a Mum, I wish you some relaxing one-on-one time with your stash. If you're creating for Mum, read on, as I show you how to create a card and little gift that will be sure to get the taste buds tingling!


As you might have seen, I'm currently creating with Pink Paislee's Citrus Bliss. I recently treated myself to a new shade of Color Shine for my collection and I kept the box for "something oneday"... Well it certainly gave me inspiration for a sweet (and sour!) treat box.

I started by opening up the Color Shine packaging and lay it flat. I then took my sheet of Flamingo Acetate and traced around the shape. Using a craft knife and a pair of scissors, I went about cutting out the shape of the box, then folding it in the appropriate areas using a bone folder. A line of double-sided tape on a couple of the folds to hold it together, and I have a cute little gift to accompany my card!


I filled the box with sour Fizz Bombs and wrapped a ribbon around it. The tag is made from a 'Pucker up' clear die cut from the Citrus Bliss Ephemera pack. I have given it a coat of adhesive (using my new fave Scrapbook Adhesives transfer sheets) and then matted it with white cardstock so I can make the sentiment more visible and write on the tag.


Punch a hole and thread onto the ribbon.


I have also been lucky enough to babysit a Minc! I have heard and seen so much about this fabulous machine that I could't wait to try it out!!

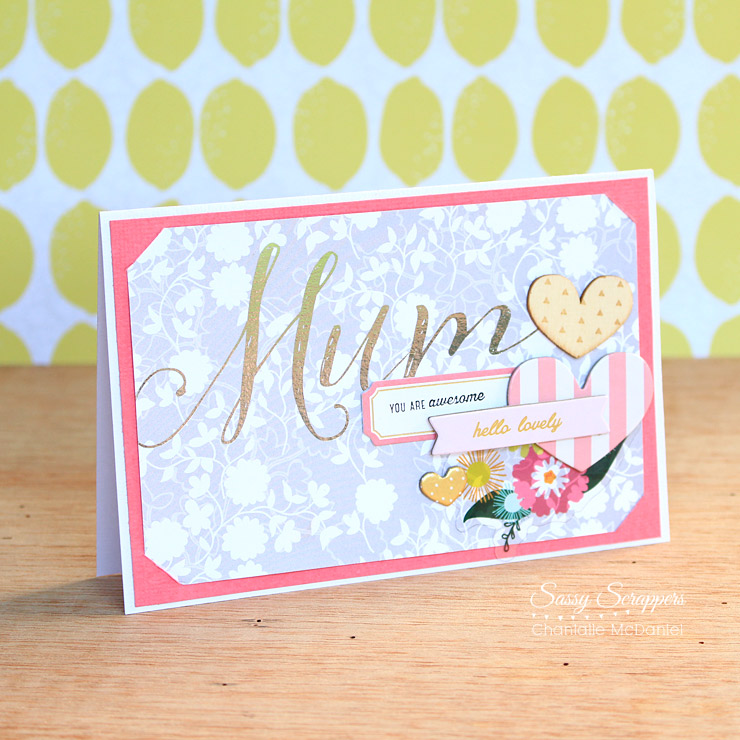
For my card, I have printed off the word 'Mum' (which I set in a word processing programme) through a laser printer. (The foil only works with this type of printing method as it doesn't stick to inkjet prints.)

With the heat setting to 3, I ran the card with some Silver foil over the top, and it came out beautifully! I can't wait to get a few more colours and play around.


The base of the card is just a plain white card. I have cut a piece of cherry cardstock a bit smaller than 4x6 and made some slits into which I slotted the foiled patterned paper. A tip to make them even is to cut a small triangle of paper to use as your guide and then position it in each corner, as shown below. Cut into the marks you have made with a craft knife.


I have also created a co-ordinating envelope using a WRMK Envelope Punchboard which I'm quite smitten with.


This is how the card turned out... I have embellished simply, using some chipboard hearts stickers, a tag and clear die cut from the ephemera pack and a heart-shaped wood veneer.


Thank you so much for popping in today. Wishing you a very special weekend indeed.

Chantalle x


Thursday, 7 May 2015

oh hey Cadet - Anita Bownds

Hi..
Today I'm sharing my take on this months moodboard using chicaniddy 365
I'm loving the bright colours this month 


I started by creating a fun coloured background using a tim holtz stencil
Impasto,pink,blue,green and yellow paint


The I cut a half inch x 12 inch strip 
and a 4 inch x 12 inch strip


Then I cut a strip of vellum on to matte my photo on 
and a circle to add on the left hand side
and used an embossing folder to add extra texture


I cut out a few embellishments fussy cut flowers and added some 
blue patterned paper behind my photo


Then added all my embellishments,title ,vellum and enamel dots


I hope you have fun with this months moodboard 
We would love to see you get inspired 
cards,project life pages,layouts
.....

Check out the products in the sassy store


Photobucket
09 10