Showing posts with label Merry and Bright. Show all posts

Sunday, 14 December 2014

December Days album with photos

Hello Sassy friends

I'm popping in to share my December Days album progress with you. 
Already I'm enjoying looking back on the busy days so far this month.

If you have missed my earlier posts on putting the album together,  
Click here for Day 9 -16 
 
Day 1
  All through my album I am using the prompts and gorgeous free 
printables from Pink Paislee.
 Turn the page divider and you get a picture of how our cheeky Elf, Freddy 
wrote us a hello message in toilet paper! This pic opens up to reveal 
another photo and some journalling.
Day 2
 The misting did show through on the underside. It wasn't crazy visible, but it was there. If you want to try this technique, I would recommend a lighter colour.
Day 3
My sweet little monkey, dressed up as an Angel for her first Christmas concert at kindy. I have added a couple of Simple Stories photo stickers onto some of my pics. These aren't in the kit, but you can grab some from the store here
 
Day 4
 I have created a little pocket by folding over a bit of the Heidi Swapp paper, 
and then cutting a 'v' shape out of it. I have lined a section with some 
of the glitter cardstock. The sides were sewn shut to hold some very 
sweet notes my Son received from his classmates.
This is what is looks like when you turn over the envelope.
'Happy Holidays' pulls down to reveal my journalling.
Day 5
The view behind the envelope which has been stamped with wood veneer. 
I have left the LHS with a bit of extra white space, where I would like 
to add more pics of lights that we see during the rest of the month.
 
On the back of the envelope I have drawn some Christmas lights. I saw this idea 
on Martha Stewart's Instagram feed. Very sweet and easy to do... simply draw 
your cable with a pen and then paint on the globes.
Day 6
Definately one of my favourites so far! The polka dot has been created with a Heidi Swapp mini stencil and some texture paste. I have highlighted a few of the spots with enamel dots to echo the colours of the water balloons.
 
Day 7
 On the LHS I have done a bit of stamping with some white Donna Salazar 
Colorbox ink. The word 'Santa' (which is hard to see on these pics) was created from a Heidi Swapp word and cut out on my Silhouette using stamp material. 
It's been stamped with silver ink.

The little frame showcases tiny notes that we get from our magical elf, Freddy. 
The other paper is my Son's Christmas wish list, which I photocopied before it was delivered to Santa.
This is one of the Pink Paislee printables which I have printed off onto 
vellum and then stitched to the confetti print Simple Stories paper 
which was already there from my foundation page work.

I've sewn around three sides before adding some sequins and sewing shut.
 
 Day 8

Another free printable, with the prompt being creating a handmade gift. 
The way the little tag attaches to the ribbon to look like a gift, echoes 
the theme for the day perfectly
 Lift the spotted vellum to reveal photos.
 Day 9
 This spread captures the special bond between my Daughter and her Kindergarten teachers. Her last day of Kindy, graduating with her little friends.
 Day 10
 Another free printable, along with a fun prompt about festive playlists. 
Do you have a favourite mix of songs that get played at Christmas time?
 Day 11

 My Son, shattered after a busy year. This photo says it all! 
I can't help but giggle every time I see it.
 Under the 4x6 Sn@p card which I have folded over, I have popped a scanned 
copy of his final school report. (It was a good one! ;)
 Thank you again for your interest in my December Days album.
If you are going to be making one, be sure to tag us, 
we would so love to see your creations!

Till next time!
Chantalle


Friday, 28 November 2014

Let's create: December Days album 9-16

Hello Sassy friends
 Thank you for joining me again as I continue sharing 
my December Days album foundation pages with you! 
To our readers celebrating Thanksgiving, wishing you and your loved ones well.

Welcome to part 2: Day 9 to 16

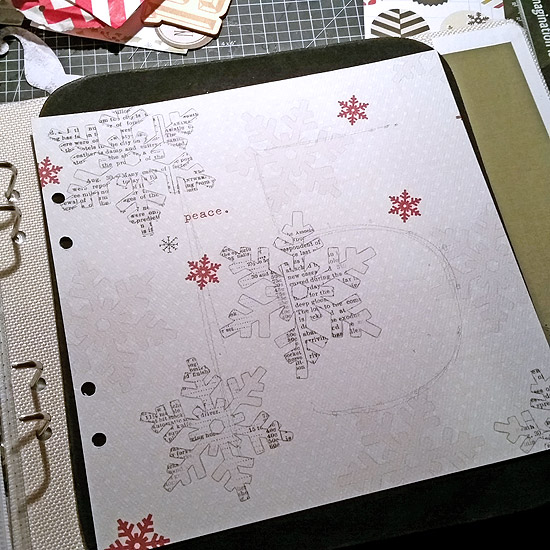
 Day 9
Patterned paper, number, ephemera, flair, glitter stickers

 This spread is very wintery as I already have photos in mind that I want to use. I have kept the colour palette simple, which really ties it together.
 Have a go at cutting your own snowflake and popping it into your album 
To make a bit more room, I have created a little pocket by cutting a slit 
into one of the album pockets with a craft knife. I can pop bits 
and pieces in there down the track.
Day10
Patterned paper, glitter cardstock, sequins

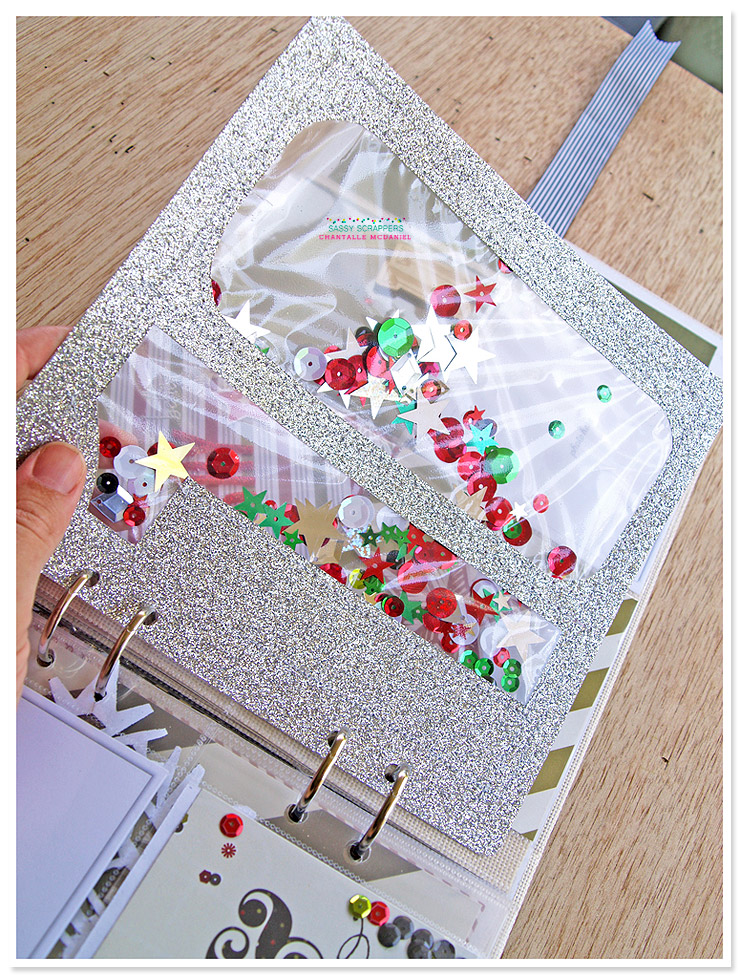
To me, Christmas time means all things sparkly and I so love a good shaker pocket!
Here's how to make your own page divider shaker:

1. Trim your sheet of glitter cardstock down to 8x8 inches. 
**Remember to reserve the strips for use further in the month!**

2. Next, using a lead pencil, trace the number you want to use on the reverse side, in reverse. You can do this by eye or maybe print off 
some large numbers to use as a stencil.

3. Using a craft knife, cut out the numbers.
4. Next, I have used a basic A4 plastic sleeve that I'm sure you have lying around at home somewhere, and filled it with some sequins. 

5. Laying the sleeve underneith the cut number divider, sort of squish them around until you are happy with the distribution inside the sleeve.

5. Now, using a sewing machine, stitch around the outline of the numbers. You can go over quite a few times as the stitching doesn't show up too much. I'll admit mine could've been a bit neater, but I'll just go with it ;)

6. Once you finished sewing, trim off excess thread and trim off the excess plastic sleeve around the edges


I love how it catches the light. So festive!
Day11
Patterned paper, number, ephemera,alphas
 Fold over a 3x4 Sn@p card to create a bit of interest with a lift-the-flap

Day12
Patterned paper, number, ephemera, doily

This has turned out to be one my favourite spreads so far!
 I created this cluster by cutting a large circle out of patterened paper 
and popping a circular die cut on top. The leaf die is a Couture Creations one 
I have at home, but you could use some ribbon, tinsel or hand cut some 
shapes like feathers and stitch them down.
Day13
Patterned paper, number, ephemera, mini word stickers

Very simple page. Have some fun by adding lots of little words that have significance to your festive period on one of the 4x4 pieces of paper. Punch one of the cards in the ephemera pack and add it on its own on top of the album sleeve.
Day14
Patterned paper, number, ephemera

Another one that I love. The acrylic page dividers are just so awesome!

I have created another stitched banner using the banner technique from my
Part 1 post, with the large triangles from the ephemera pack. Create a cluster with different elements from the pack.
Day15
Patterned paper, paper clip, ribbon, Sn@p card, Merry & Bright stickers, glitter cardstock

Hand stitch your number for wow factor!
 How to create this fun stitched page divider:

1. Use one of your page dividers that we have already prepared last week 
(A 12x12 trimmed to 8x8)

2. Using a lead pencil, draw the number you wish to use on top.

3. Using a paper piercer, or a large needle or pin, pierce the papers at regular intervals along the pencil lines. (see arrows below) Once you have pierced all the holes, erase the lines with an eraser.

4. Now, thread a thin ribbon (you could also use twine) and backstitch all along the numbers, using your holes as guides.


The final product is very striking! Embellish very simply to really make it stand out.

Day16
Number, glitter stickers, alphas, journalling spots

A banner style heading and a photobooth place holder for later. 
TIP: Attach your journalling and other bits to your binder
You can see I have given my number a bit of a dazzling!

Here's how:

1. Go over your wood veneer number with some silver paint, a paint marker (what I have used) or some mist


2. Once dry, go over the debossed area with some silver 
Stickles or similar glitter glue


Ta da! Looks fantastic doesn't it!

Thanks again for stopping by. I hope I have given you some ideas to get you excited about starting your album!

Join me again next week, when we look at days 17 till 25.
 Till then!

Chantalle
09 10