Sunday, 14 April 2013

Arty Fun with Fancy Pants Trend Setter.....

Hi Rikki here, how are you this Sunday morning? well finally over here in the West its is cloudy and we finally have some rain!!! so with the weather here like this what else can you do except scrap right?

Today I am going to share with you a way to break down how to use a sketch, especially for those who want to enter this months Sassy Scrapper's sketch but are not sure on how to do it. When I created this sketch I wanted everyone this month to get arty, to use there stash of paints, Shimmers, Glimmer mist, Heidi Swapp Colour Shine colours, Dylusions and Mr Huey's misters.
 
When I first look at a sketch I like to figure out how I can change it from what is there, yes I am a rule breaker and I promise you it is very rare that I will keep a sketch in its original form, so this is how I was going to start the sketch.....
 
 
Yep that's right I flipped it...... The next focus for me is the background that big circle and as you have seen from the other design team members we have all interpreted that very differently, for my first example I used a square but this time I want to share a cool technique that I have been having fun with lately .


Its a blending, bleeding technique that you can use with a lot of different brands of misters....
 
Pick a couple of colours that have the same tones and make sure you have a roll of paper towel ready....
 
To start off this technique wet your cutting mat with a mister bottle full of water, then wet the back of your cardstock and sit it on your wet mat trying to make sure its flat, then mist the front of the cardstock and be very generous as you want the glimmer mist to pool and pull around your page. By doing this it will eliminate all the harsh lines you get from your mister and it gives you time to blend colours and it will also stop the cardstock buckling.
 
Use your mister bottle full of water to blend out the dots from the colour and it will make it bleed out. So as you can see at this point your mat and paper is very wet and it will keep "pulling'' across your page.

 
If you happy with the results mop up some of the extra water with your paper towel but don't dry it off completely because this is the time that you will want to add a highlight colour. 
 
Once you start adding in the highlight colour, pull out the water bottle and repeat the first steps.
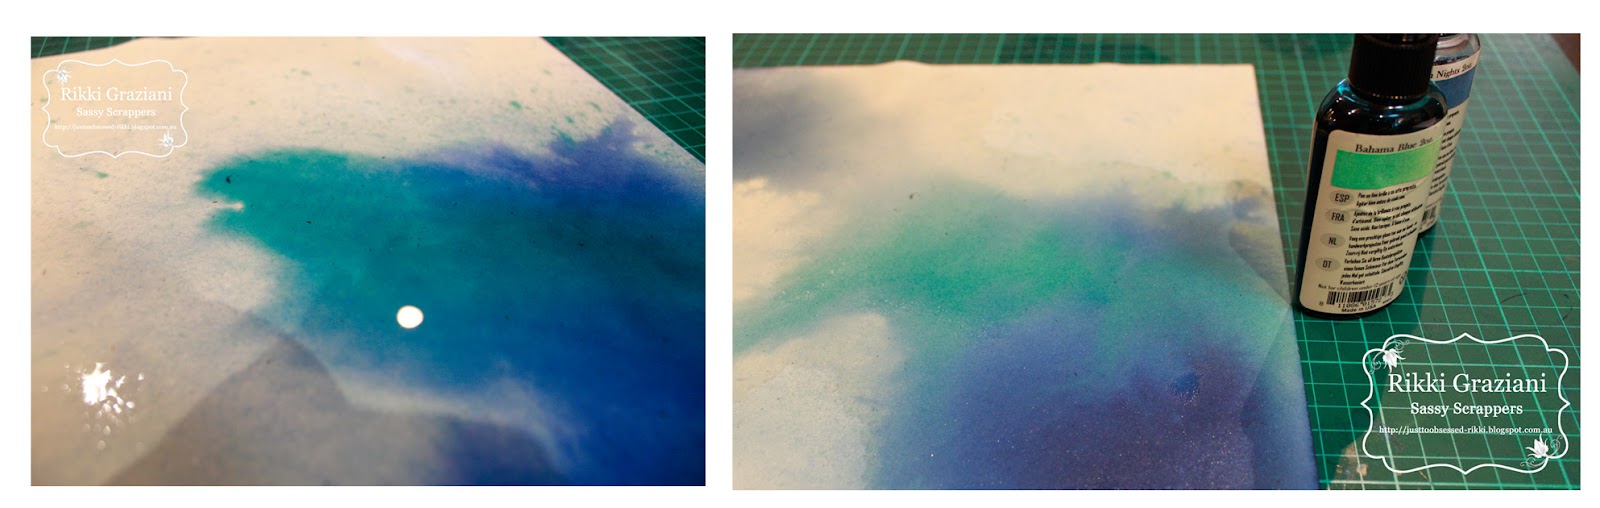
 
Now as you can see the page is quite wet, grab your paper towel and mop up the extra water especially where there is no Glimmer mist as it will leave a watermark on your page. Now here comes the hard part, you can either grab your heat gun to dry it, if you do this make sure you are alternating the heat gun from back to front as it wont leave ''burn'' marks also after its dry you can iron it on a low temperature between two towels.
 
But my personal preference is it leave it dry naturally, as soon as it is half dry carefully lift it and place some paper towels underneath it , and leave it to dry and believe it or not it its really flat as you can see below. While I have misters out will go and play with different combos of colours and I do a few different backgrounds for later on.
 
So now comes the quickest part of the sketch, picking your photos and your pattern papers, sometimes I find it easier to print the sketch out and have it on my desk for reference especially if you have flipped it and you have a number of layers.
 
 
And then you just follow the sketch remember you can layer different things, add washi tapes and don't forget your stickers. I am very lucky this month to be sharing with you Fancy Pants Trendsetter kit which has everything you need and it all co ordinates which is a great time saver and money saver too.


This kit has the best sheet of tags that you just have to cut out and stick on your layout and with easy stickers you have instant journaling.


So hopefully you enjoyed my first tutorial ( thankyou to Darling Hubby for taking some of the step by step photos) and I cant wait to see what arty backgrounds you come up with for this months sketch and don't forget you can win a $20.00 Store Voucher, entries close on the 30th April..

Photobucket

Saturday, 13 April 2013

April Sketch - Adriana Bolzon


Hi there everyone, it's Adriana Bolzon here,
 back again at Sassy Scrappers,
today I have
another layout created with the new 
Kaisercraft Paper collection - NEEDLE & THREAD

This paper collection is available from 
Here is the link to the paper range
Thanks so much Olga for this fantastic opportunity to
create with new collections and new products.

Here is my layout based on the Sassy Scrappers
April Sketch competition.
Cherish - Paris Love

This paper range is so flexible


Every month the talented
Designers create sketches, this month
 "Rikki Graziani" @ Sassy Scrappers has
created a fabulous sketch, anyone can enter.
Here is all the information

Here is the fabulous sketch


You could be in a chance to WIN a voucher 
of $20
to spend
at Sassy Scrappers
Have a go, you never know :)

You still have time to enter, closes on the 30th April.

Products used are
Kasiercraft Honey, Ruby & Sage paper blooms
 also papers
Needle & Thread paper - Pattern P1143 for the background-
I painted and inked with 
Vintage Photo Distress Inks and paints


Backstitch P1141 & Collectables CT754

Sticker sheet SS181

Script  - clear stamp

Textured crack - clear stamp 

Kaisercraft Wooden doily & words
check them out HERE and these
gorgeous

Prima Wooden Bird Icons


Well that's all from me today
you can find me here 

Adriana Bolzon Blog

I will be back later this month at
Sassy Scrapper
with another layout I have created with
the Bo Bunny - Family Is
paper collection

Thanks for looking :)
Cheers Adriana XX
Photobucket

Friday, 12 April 2013

Birth-daze

Happy Friday to you!
My house is abuzz with excitement this morning, as it's my darling boy's 7th birthday! 
Cake is on the menu for most of April actually, 
as lots of my nearest and dearest celebrate turning another year wiser!
Glitz's 'Color me Happy' collection, with it's irresistible brights, is perfect for spreading 
the birthday cheer!
This card was made for a dear friend who celebrated 40 fabulous years this week! 
I've used some Kaisercraft cardstock in Coconut as my base. For the numbers, I cut various sized '40's' as well as the word 'naughty' on my Silhouette.
I sprayed the '40' with Mister Huey's and used a Crafters Workshop mini Hexagon 
template along with some Color Shine in Sweet Cherry. The little birds were fussy cut 
out of one of the Color Me Happy Whatnots. I coated the smaller one with adhesive 
then glitter for some extra bling!
I wanted to make a clear tag, but it didn't stand out that well against the blue gift bag... so I backed the tag I cut from the pack of 'Peekaboos', with some white cardstock. I cut the sentiment out from the 'Bits and Pieces' sheet and complimented it with some fussy cut hearts and a little date tag. The seam binding was coloured with Color Shine.
I jazzed up the little gift bag with a gorgeous 'garland' from the Whatnot's pack and popped on some twine (which I coloured with Color Shine) and secured with a brad at each end. 
A giant rhinestone is the perfect finishing touch!
Thanks for stopping by today. Hopefully you get some time to cook up something fabulous for our sketch challenge over the weekend!

Chantalle


Photobucket

Thursday, 11 April 2013

Hearts in the sand..

 hi everyone,
Today im sharing sharing my layout i did for this months sketch using Simple stories vintage bliss
this pattern paper is absolutely lovely
this months sketch is designed by the lovey Rikki

>>>>>>>>

as i wanted the colours to pop i used black cardstock as my base
flicked mango,hot pink and sea breeze kaisercraft paint 
on my black cardstock then added all my elements referring to the sketch
 

 absolutely love love these flowers


and 


 i added the little chipboard heart with twinge ,string and a little flower
 
>>>>>>>
 
 so come on join in the sketch its super fun and you have a chance to win
 
$20 voucher for the store with FREE postage
(international will receive a prize pack to the same value)
 
happy crafting
hugs 
Anita
Photobucket

Tuesday, 9 April 2013

Graphic 45 Secret Garden Sketch Challenge

Hi There!
This month I have the extreme pleasure of playing with Graphic 45 Secret Garden. This is just such a gorgeous collection! I could just sit & fussy cut all the gorgeous images for hours!
Earlier this month the sketch challenge was released. A fabulous sketch designed by our very own Rikki Graziani!

Here is my interpretation of the sketch using a more traditional/vintage design


My kids love the Pancake Parlour! It is tradition for us to travel to Melbourne at Xmas time to visit Santa at Myers, check out the Myer windows & visit the Pancake Parlour for lunch. I'm not sure whether it's the giant milkshakes or the pancakes they like best!

Lots of fussy cutting of flowers & gorgeous vintage images using foam tape to give them some dimension

A cluster of flowers & lace with some more fussy cut images

Some gorgeous Prima flowers. I just love the new Prima flower Paquita (in Meadow)

Products Used
Graphic 45 Secret Garden Springtime
Graphic 45 Secret Garden Meadowlark
Graphic 45 Secret Garden Beautiful Blooms
Graphic 45 Secret Garden May Flowers
Graphic 45 Secret Garden Alphabet Sheet
Graphic 45 Secret Garden chipboard sheet
Prima Paquita Flower Meadow
Prima Audrey Rose Iced Violet
Kaisercraft mini blooms Iceberg
lace
Ranger Distress Ink Walnut Stain

You can find Graphic 45 Secret Garden in the shop here

Here are the challenge rules

Entries close at midnight on the 30th April  2013 (AEST Victoria). 
Please link your April entries with a direct link to your blog/gallery using the Inlinkz tool.
Include your name and country in your entry. 

Entries are open to anyone, anywhere in the world. 
We are happy for you to use our sketch in combination with other challenges, but please mention us. 
The Design Team will vote and the winner will receive a
$20 voucher for the store with FREE postage
(international will receive a prize pack to the same value)


To check out more of my work you can find me here
Thanks for looking!
Cheers
Photobucket

Sunday, 7 April 2013

Another Sassy Sunday...

Hi Rikki here, OMG!!! can you believe it is already April!!!!! I cant beleieve it, that means I have already been on this Design team 2 months, 8 posts already and the way time is flying it will be the end of the year in no time. Well hopefully I am still inspiring you all and trust me when I say I have plenty more ideas.

While I am going through another spectacular Dt kit from Sassy Scrapper's I thought I would share with you one more Amy Tangerine layout. I love this layout pink and orange are one of my most favourite colour combinations and I love this Ombre Chevron piece. 


Have you ever  wondered what to do with those tags you get in die cut packs like these Amy Tangerine Yes Please Die Cut Shapes Create, have you ever though of making them into your title?

"Oh my Goodness, you are wonderful & Too Funny'', the "2'' tag is in reference to my daughters age....


Don't be afraid to mix up your shapes, by using foam mount it helps create height and interest and allows you to add flair buttons from Greatest View.

Yes Please Reflect Paper

Yes Please Moments Corrugated Paper Teal


Yes Please Die Cut Shapes Create

Spritz Chick a Dee Spray Mist
Don't forget to have a go at this months Sketch challenge to see it pop over to Sassy Scrappers blog....
 
Photobucket
09 10