Monday, 7 September 2015

Project Life Monday.. !!!

Hello Sassy Friends! Welcome to Project Life Monday. Today I am sharing my PL2015 | Week 26 using October Afternoon Summertime Collection & Crate Paper Wonder.


This week I thought I would create pocket pages with a mirrored technique. It is quite a simple technique but is also very effective when it comes to clean and simple design. If you like symmetry, then this style will appeal to you!


I am continuing my PL2015 using the Becky Higgins Project Life Design A pockets. I have been consistent throughout the year with this design as it helps me be organised throughout the weeks before I even start to add anything to my pockets. By using the Design A pockets, I already know how many horizontal photos/filler cards I might need to go alongside the vertical/portrait pockets that need to be filled.


If you look at the full spread for week 26, you will notice the filler card placement in the middle row (the 3x4 pockets), is allocated to the two outer pockets and the remaining four pockets have been supplied with portrait style 3x4 photos. The mirror technique with this row is very obvious but it also provides white space for the eye to rest as it travels across the page.


page1image11232
page 1..

page 2..

However, this isnt the only place I have used this method for 
Week 26. On each individual page I have also played with the diagonal lines.
On page one, the top pockets correspond with their diagonal bottom pocket by either containing a full photo, or a coordinating filler card.


Page two is much the same.


During this week, our family went on a road trip. There were many photos opportunities; therefore I condensed the snap shots taken, into two collage style images, to include as many as I could in my Project Life.

Printed out onto a 4x6 photo sheet, I placed them into pockets that were also diagonally opposite to each other. Not only does it help to tell the story in a sequential manner, but the white space mimics areas on page one.

Finally I applied the same principle to the last two diagonal pockets. They now house two photos from my Instagram feed. To keep a cohesive look, Ive layered each photo with embellishments from Crate Paper Wonder.


Thanks for visiting today. I hope these simple ideas help you keep on track with scrapping your favourite memories with Project Life..x
page4image6104
Photobucket

Sunday, 6 September 2015

Winner... Winner.. Winner...Guest Design Spot

Hi Scrappy Friends, Olga here tonight to announce the winner of our August Recipe Challenge and the Winner of our Guest Design Spot for October...

I must say thank you to you all, for all the beautiful entries that were submitted this month.. We loved each and every one of them and are grateful for the work you put into the submissions..

This months winner is:


KAT

Congratulations Kat and please email us and we will send out a DT Kit for your Guest Design spot in October.. sassyscrapper@wideband.net.au

Please join us and play along in September...

Checkout the Recipe board below and the blog for the DT Girls projects for inspiration...


Have a wonderful night...xxxx

Photobucket

Friday, 4 September 2015

Hello Spring - Using images to create cut files

Hello Sassy friends!

I'm sure you've seen this month's fun word and sketch challenge, which also includes a great little freebie from Anita for the word Spring! For those of you with Silhouette Cameo's that would like to use the file but are not exactly sure how to get it from an image to a cut file, I've included a little step by step below, to help you along.


For my page,  I have rotated the sketch 180 degrees and kept a tighter focal point. The background uses a Dear Lizzy floral stencil with some matte pink mist. There is also watermark butterfly stamping which hasn't come out very clearly in the photos. If you scrunch your eyes a bit, you can make them out ;)


There are also floral die cuts, and in keeping with the spring theme, a few butterflies. I thought I would stick with the pink palette for a bit of oomph!


How to create a cut file from an image

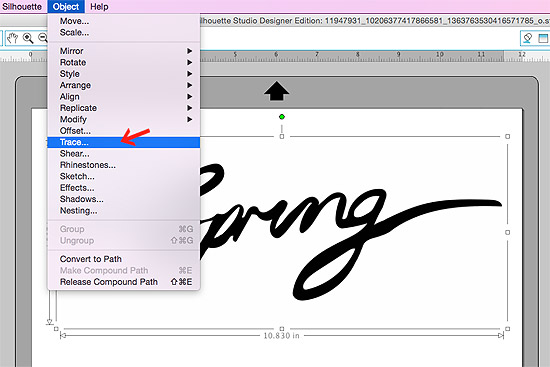
1. Start by opening the image in a new page. Go to file>open and then select the image you want to use. Strong contrasting images with clear edges work well. If necessary, resize the image so it fits within the boundaries.


2. Once you're happy with the placement, go back up to the the Object menu, and scroll down to 'Trace'. This will open a menu to the right with lots of trace options.


3. Click on the 'Select Trace Area'...


...and then go back to the image you want to trace and draw a box around the image.


4. Look in the trace options menu and adjust the High/Low pass filters with the sliders until you get a good, even coverage of yellow over the area you want to cut.

Once you are happy, click on the 'Trace' option (as shown below) which will convert the yellow highlight...


... into a red cut line, ready to cut or save for use at a later date.


Thank you so much for stopping by. I can't wait to see this month's entries!

Chantalle x


Like this page? Create with these similar products from the Sassy store


Dear Lizzy Documentary Stamp Set Daily Stories Butterfly StickersPrima 6x6 inch Stencil - Floral BouquetDear Lizzy Serendipity Nesting Metal Dies 6pkKaisercraft Majestic Butterfly Small


Thursday, 3 September 2015

Spring layout with Anita Bownds

hi ..
today I'm sharing my take on this months challenge using the absolutely lovely collection from
Oh gosh the colours are just absolutely beautiful just love them 
if you haven't seen them yet pop on over to the sassy shop and take a look
And here is this month challenge 


 and here is the link to download the cut file

I love everything about spring the birds singing in the garden,
 the bees doing their thing flower hopping 
I love to just sit and watch nature at its best 
but I really like talking photos of blooming flowers in spring and this rose was given to me from my day for my birthday years ago..so I couldn't wait to get another photo of it blooming 


I followed the sketch layering my patterned papers first then I cut the circles 
From one on the patterned papers and randomly placing them across the page referring to the sketch


Then using a mini Doily die cuts I added 2 to my page and embellished with stickers and the word happy dance using the roller phrase stamp


I cut the word spring using my Cut file with my silhouette cameo on some printed toner sheet and foiled it with a light pink using my minc machine 


I hope you have enjoyed my take on the challenge and inspired to join in..
Oh and if a product is not stock just notify Olga and I'm sure she can get more in..

Products used in the sassy Store
*** More on Order.. Dear Lizzy Documentary Paper Pad 6x6 inch*** More on Order..Dear Lizzy Documentary Ephemera Die Cuts 36pcDear Lizzy Documentary Puffy StickersDear Lizzy Documentary Roller Stamp 12 PhrasesHeidi Swapp Minc 12″ foil ApplicatorMinc Reactive Light Pink Foil 12.25"X10' Roll


Photobucket

Wednesday, 2 September 2015

September Spring Challenge


Hello Sassy fans.  Leonie here today sharing our September Spring Challenge.  As September is the first month of Spring here in Australia our challenge this month is to include the word 'Spring' on your page somewhere and there's also a sketch to follow.
Our lovely Design Team member Anita Bownds has supplied us with this months' sketch and inspiration picture.


As a special bonus we've included a freebie cut file if you wish to use this on your project.

I used the lovely holiday/travel papers from the 'Journey' collection from Crate Paper
With Kraft as a base I added some of the Kraft patterned papers from the collection along with
some of the Teal papers and some gold accents.  


Here's a larger - up close version of the sketch for you all.


I've been dying to use this cute little caravan sticker on a page and this was the definitely the one as I was scrapping some pictures of our camper.  


The circles and rings were all punched out with circle punches and the drips and splats were made with Color Shine sprays.


Here's Anita's super pretty page.  It's just so lovely and she really has the spring theme going with some lovely floral papers and as you can see she's used the cut file.


I hope you're feeling inspired to take part in our sketch challenge.
The linky tool will be up, as usual top right of the blog, in a few days time.
Happy Crafting.
Cheers,
Leonie Neal-Dawson.


Photobucket
09 10