Showing posts with label Fuse Tool. Show all posts

Sunday, 12 February 2017

Agnus | Project Life Insert

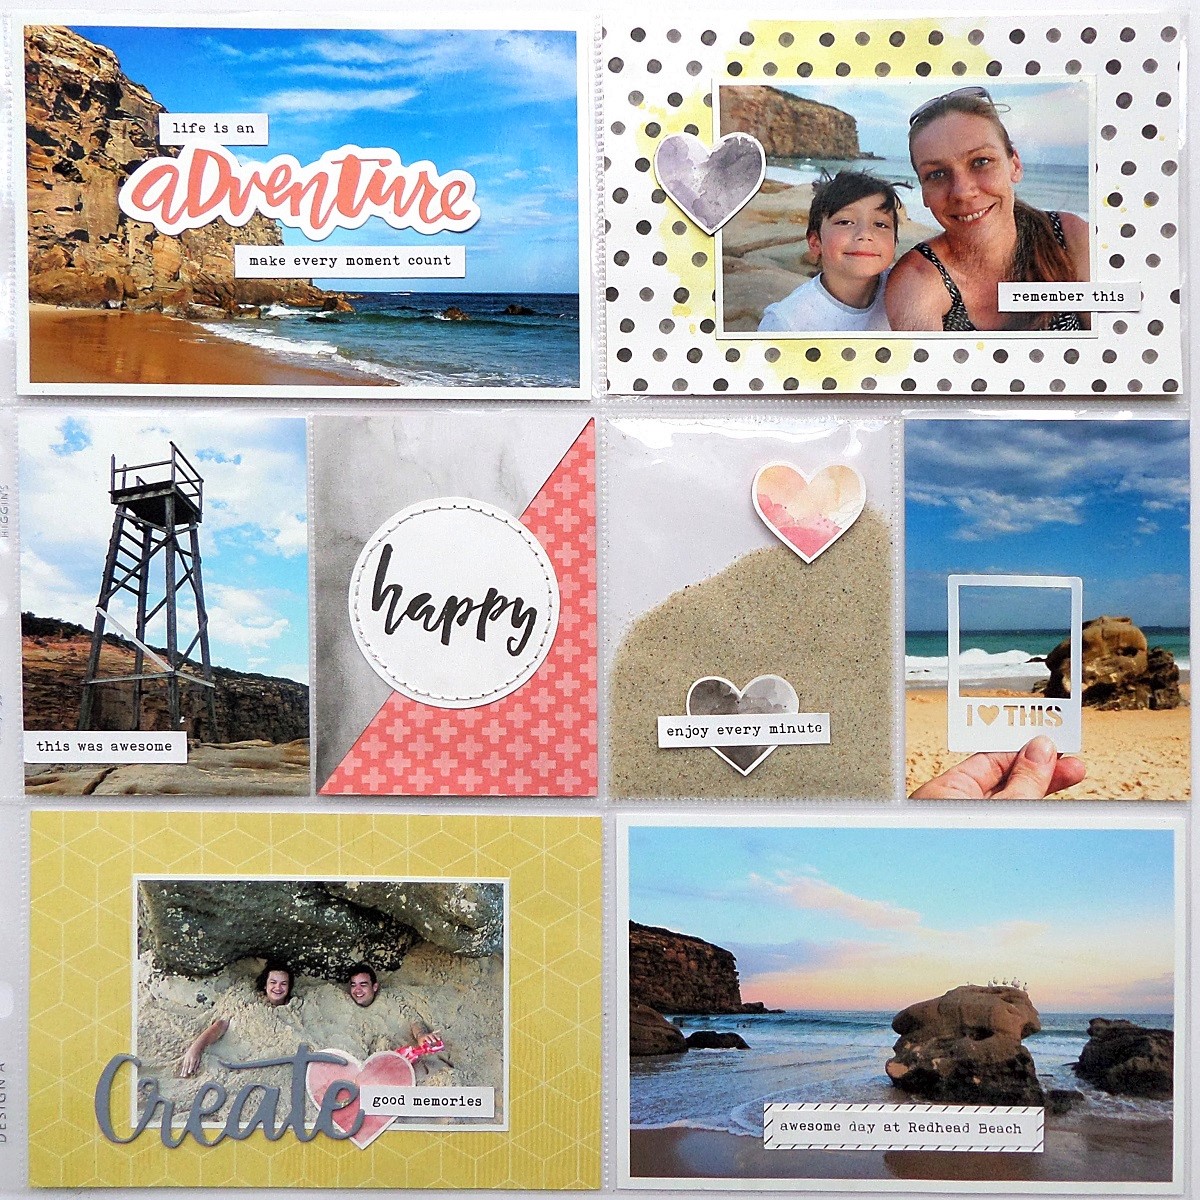
Hi again :) I have completed the insert I mentioned in my previous post documenting one of our summer adventures. 


I kept to the same products as the previous pages, with more watercolour elements to help tie things 
together. 


I combined a die-cut word with some simple journal strips to begin the page, and often use landscape photos as a backdrop for my journaling. I added a section from one of the watercolour cards I created in my first post to create a fun filler card - using the stitched accent to visually ground the two sides together.  


Bringing home a little bit of the beach with us, I used my fuse tool to enclose some beach sand into one of the pockets - adding a few hearts from the Pink Paislee Moonstruck 'No:6' Paper on the outside of the page protector. 


 Printing some of the pics smaller than the pocket allowed me to add colour with a patterned paper background as well as some dimension with the fun Hazelwood Chipboard phrases. 


Using the reverse side of the insert to document a different location - I created a couple of split cards that combined different patterned papers for an easy way of adding more colour. 


I used a frame from the Maggie Holmes Gather 'Moments' Paper and a chipboard accent from the Hazelwood Chipboard Thickers as a place to ground my journaling over another landscape photo. You can also see the reverse side of my sand pocket here and how I added another heart to hide the adhesive from the other side. 


I created another split card as a background for a smaller photo and used more watercolour hearts from the Pink Paislee Moonstruck 'No:6' Paper to add more interest to the page. 

Products from the Sassy store...
Crate Paper Color Reveal Watercolor Set 
Hazelwood Chipboard Thickers 
Project Life Fresh Edition Ephemera 
Hazelwood 'Roses' Paper 
Maggie Holmes Gather 'Moments' Paper
Hazelwood 'Sweet As Honey' Paper
Pink Paislee Moonstruck 'No:6' Paper 
Pink Paislee Ces't La Vie 'No:6' Paper
Core'dinations 12x12" White Cardstock Pack
WRMK Photo Sleeve Fuse Tool


Photobucket

Saturday, 22 August 2015

Fabulous M

Hello Sassy friends!

I hope you are enjoying some wonderful downtime this weekend and get to do what we all love best - create!

I've been playing with my fabulous Minc and Fuse again and created this page featuring my beautiful Sister, on a birthday a couple of years ago. The piggy balloon proved to be a fun addition to the festivities! It's pretty difficult to capture the foil colours on camera, but I hope the close ups will give you an idea of how gorgeous and vibrant the foiled areas are in real life.
 

The large 'M' was foiled with some fun holographic foil I found at a hobby shop. I really love how smoothly the foil applies to the Heidi Swapp Minc accessories.  The striped Wanderlust paper has been run with lots of messy machine stitching and multi-coloured thread. It's a fun touch to change up the stitch on your machine, from straight to zigzag. (Just be sure to lift the needle out of the paper before changing the settings!)


The 'celebrate' wood veneer has been treated with some of my favourite hot pink Hero Arts neon mist. When it was dry, I sprayed parts with some Heidi Swapp Raspberry Color Shine and then after that was dry, I added touches of magenta embossing powder and heat set it.


The image is set on a layered cluster consisting of a sheet of the triangle cut lace paper, which has been stamped with the 'Pool' ombre Hero Arts ink. The quick shaker pocket was done with my Fuse and filled with a selection of sequins and a large blue foiled Minc flower. The Minc frame has been foiled with hot pink.

 
Thanks so much for stopping by today!

Chantalle

Like this page? Create your own with these materials from the Sassy Store

WRMK Photo Sleeve Fuse Tool (AU Version)Minc Chipboard Frames 3"X3.5" 4/PkgMinc Polka Dot Alphabet 55/PkgMinc 3-D Paper Flowers 70/PkgMinc Reactive Hot Pink  Foil 12.25"X10' RollWanderlust 5x7 Lace Paper PackWanderlust Boutique Paper 12x12Wanderlust Wood Veneer CelebrateWe R Memory Keepers Gold Sequins StickersKaisercraft Aqua Marine RhinestonesRhinestones Hot PinkDoodlebug Kraft In Color Sequins Assorted Swimming PoolHero Arts Neon Pink Spray 1ozHeidi Swapp Colour Shine RaspberryDoodlebug Kraft In Color Sequins Assorted LilacHero Arts Ombre Ink Pad - Pool to Navy

Friday, 3 July 2015

Crate cards

Hello Sassy Friends!

Phew, to me it feels like the first week of school holidays has just flown! Hoping that those of you on QLD school holidays have survived the first week ;)

My card stash was looking a touch sad, so I've topped it up using some Crate goodies as well as my little friend, a WRMK Fuse tool. If you have one, I'm sure you would have clapped your hands in delight (as I did) when you saw your custom pocket creations coming to life before your very eyes! I will be endevouring to tell you more about this handy tool as well as the Heidi Swapp Minc (which will be hitting the store shortly) over the course of the month.


This cute shaker pocket was created by first trimming up a bit of leftover Crate Poolside 'Flip Flops' paper. I really liked the ombre angular pattern and used the printed area as guidelines for cutting.

I then took a 12x12 page protector (you can use any make you like, not just the WRMK ones) and trimmed a piece slightly bigger than the card I had just cut up. I arranged the pieces within the plastic sleeve, leaving a gap between the pieces, and then, using the roller-shaped head which comes with the Fuse tool itself, I sealed the outer edge of the plastic pocket, to create a custome size pocket for my cut up card.


Once I had trimmed off the edge with a pair of scissors, I used the Fuse ruler to create a nice straight line between the pieces of card. This created 3 seperate little pockets, into which I popped the sequins.
 
Here you can see how I used the Fuse to seal the outer edge, as well as fuse the spaces between the cut pieces of card.

Once the sequins were all in, I sealed the top edge of the pocket so they, and the card, could not fall out. Imagine the fun Christmas cards you could create with this tool!


This card uses a clear frame with gold glitter detail from a pack of Crate Poolside frames. I've embellished with some blooms (Maggie Holmes floral die & leaves) a cute bow and sentiment sticker


The pink leaves were created with some Fimo and a silicon mold, then baked in the oven.


This card uses the totally hoardable glitter plus signs vellum from Poolside.


Very simply embellished with a 'Thank You' cut with a Heidi Swapp metal die and some gold foil paper. A little banner with a scrap of paper and a bit of glitter ribbon finishes it off.


This card has a craft base, onto which I have used some white Dylusions - which has excellent opacity - through a Dear Lizzy stencil.


 I've used a couple more Poolside cardstcok frames as well as a chipboard banner sticker.


Next, a super simple card number three uses a Prima paint splat stamp and some Hero Arts Ombre ink.


Over the top. I've punced a small hole into the actual card itself and run some twine between the tag (which came in the Mason Jar set) and the card to create a bow.


Finishing touches: some adhesive sequins and a few splats of neon Pink Hero Arts


Sweet and simple with a slightly distressed look...


A scrap piece of the glitter plus sign vellum with a smudge of the ombre ink pad mentioned above, layered with the chipboard sunglasses sticker, which has been roughed up with a bit of sandpaper.


 My final card, uses a plain white card which has been run through a Cuttlebug with a floral embossing folder. Over that, I used a leftover Citrus Bliss Insta card and some Flamingo print acetate.


On top of the tag I've layered a couple of sweet hearts, which I've machine stitched, that come in the Mason Jar pack.

 
Thanks so much for stopping by today. I'm sure by now you would have seen the amazing new moodboard for July. I hope you will join us!

Have a great weekend!

Chantalle

Like these cards? Create them with these Sassy Supplies:
 
WRMK Photo Sleeve Fuse Tool (AU Version)


09 10

