Showing posts with label Raven. Show all posts

Friday, 25 October 2013

Halloween Cool!

Hello Sassy Friends!

Hope you've had a good week. Our thoughts go out to any of our friends 
who have been affected by the bushfires. Please stay safe.

I'm changing pace and bringing you a Glitz Raven layout today. 
I have had SO much fun with this collection this month and I'm counting the days 
until we can take our big bunch of spooky kiddies out to cruise the streets, looking for treats!
Eye see you!! I bought the title cut from the Silhouette store 
and popped a fabulous giant rhinestone over the letter 'o'.
My hunt for orange embellies led me to my pack of Pink Paislee 'Hey Kid' ephemera. 
I cannot tell you how cool they are. Seriously. 
The webs are an old Bo Bunny stamp from my stash. I first stamped them using white ink, but they looked a bit flat, so I popped some clear embossing powder over the top and blasted those babies!


Don't forget our challenge this month!
Scraplift one of the DT's ... There's still time to enter.
You choose which Design Team Member and any one of the pages/projects (hint hint!)
 they create this month.
Link your entry using the linky tool on the right of the blog

Wishing you a fabulous weekend!

Chantalle x


Raven Lines PaperRaven Triangles PaperRaven Chevron PaperRaven 12x12 Titles & Accents StickersRaven Whatnots


Here and Now Chalkboard Light PinkRaven Giant RhinesstonesHey Kid Ephemera  Color Wash Clear Stamps
Photobucket

Friday, 11 October 2013

Decor using Glitz Raven

Hello Sassy friends!
Hope your week has been good to you (and if your kidlets are back at school, 
I hope you are enjoying the silence, hehe)
The countdown has kicked off to our annual Halloween soiree and I have been back at the 
home decor crafting, using the fabulously spooky Glitz Raven, in store now!
First up, I've made this sign for my front door. 

I've taken the 4x6 'Love Halloween' card from the Raven 'Whatnots' and popped out the letters in the word Halloween. I've back it with some 'Triangles' paper and then mounted it with some foam dots onto a piece of 'Diamond's' paper.

I've embellished it using some orange flowers that I've inked, a Raven Giant rhinestone and enamel dot bling. I've taken a large pearl and drawn a spooky little face on for some fun.

Punch a couple of holes at the top, thread some twine or ribbon and you're good to go!

Next up, I've made some super easy lanterns.

These little guys will cost next to nothing to put together and you can 
store them flat for use again next year!

1. Start off by trimming a section of card stock or patterened paper 225mm (h) x 135mm (w)

2. Give it a fold at 135mm from the top. (Effectively giving you a square shape at the top)

3. Next, draw (or use your Silhouette or similar cutting tool if you wish) a design on the top section. This will be where the light from the lantern will shine through. I've done a simple moon and stars shape and cut them out using a scalpel.

4. I wanted to use a coloured vellum, but I didn't have any orange... Enter some markers!
 I've used my son's orange marker and coloured a piece. Worked a treat!  Back the cutouts with vellum.

5. At this flat stage, it's probably easier to embellish. Once you're done, it's good to give the lantern some little struts for support. I've just cut two pieces of card and given each a little fold at the top and bottom. Adhere them to the inside of the lantern, near the bottom fold. Bear in mind, the width will be determined by how large your cutout area is.


The pumpkin one follows the same process as above. 


Printing the template onto some 'Triangles' paper, I've hand cut the face out using a scalpel. Once again, I've backed this area with vellum and embellished with a tiny spider stamp and a raven shaped Whatnot. I've put a bit of adhesive at the top and dusted it with some orange glitter.

To save little fingers (and your pretty paper!) Pop an electronic tea light behind and you've got a great (safe) lantern you can use again and again


Thanks for popping in! 
I can't wait to see if anyone gives these little guys a go for the October challenge!

Till next time!

Chantalle


Photobucket

Friday, 4 October 2013

Spooktacular October Calendar

Hello Sassy Friends and hello October!
Well the countdown has begun to one of my best times of the year. I love all things dressing up and Halloween gets me positively giddy! All through October I will be sharing ideas using Glitz Designs 'Raven'... and to start us off, what better way than a little calendar to count down the days till All Hallows Eve!

I saw a 'pop top' card many moons ago in Creating Keepsakes I think, by Julie Munoz. 
I have used the template as a base here.

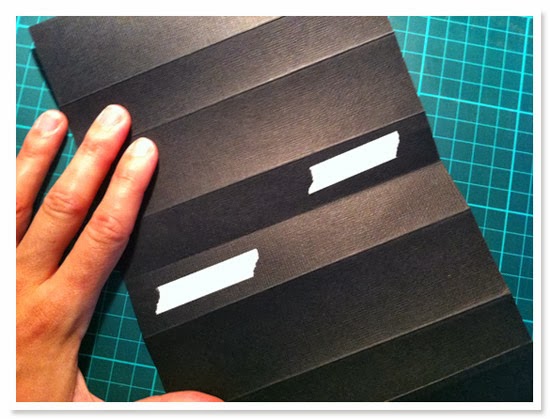
To start, you will need a sheet of 12x12 black Kaisercard

Trim it to 290mm (h) x 160mm (w). Then, fold it as shown.


Fold the first section over at the top and bottom and pop a bit of double sided tape on each end. 
Don't put tape all the way across! We want the middle to remain open so we can slide the calendar stand and a few other bits inside.
On the under side of the Valley fold, apply some tape. These two strips will adhere together.
Now, you are going to effectively roll your folds in on themselves to create (for lack of a better word!) a kind of binocular shape. The valley fold will glue together, leaving two rectangular box shapes.

Next, take a piece of firm card stock and trim a piece that's 240mm (h) x 95mm (w). 
Cover this with some Raven Triangles paper.
Next, take a sheet of Raven Countdown paper and, using the lines on the paper as a guide, trim all the numbers into roughly equal sized squares. Punch each piece near the top and stack. These can then be threaded with some Kasiercraft album rings (or similar)


Next, we are going to make 3 folds in our covered cardstock. 
The first one at 112.5mm from the top, then at 225mm. 
The first fold will be where the mini stand will fold in 'half' 
and the second fold will be a support fold that will adhere to the bottom of the stand.

Using your already punched calendar days, position them on the folded covered card stock and punch holes to correspond. (scroll down and this will all seem a bit clearer hopefully! lol)

The covered stand is going to slot into the area that we left 'open' on the black card stock stand.

Once your stand has been slotted into the base and you've threaded your mini calendar onto the stand,  you are ready to decorate! I have used some bits and pieces of Raven ephemera along with some Rhinestones. I've misted the bat and witch chippies with some Heidi Swapp Black Velvet Color Shine and added some shine with glossy accents. The tree is actually a sticker that I have backed with some black paper and fussy cut.
I hope you will give this a try for our fun October Scraplift challenge!
This month we are challenging you to scraplift your favourite DT and link up your entries 
on the home page.  

I am loving turning the little pages to reveal a new day and spooky word! If you have any questions about how to put this together, please drop us a line or pop it into the comments section.

Wishing you a fabulous weekend!

Chantalle



Photobucket
09 10