
Hello Sassy friends
Thank you for joining me again as I continue sharing
my December Days album foundation pages with you!
To our readers celebrating Thanksgiving, wishing you and your loved ones well.
To our readers celebrating Thanksgiving, wishing you and your loved ones well.
Welcome to part 2: Day 9 to 16
Day 9
Patterned paper, number, ephemera, flair, glitter stickers
This
spread is very wintery as I already have photos in mind that I want to
use. I have kept the colour palette simple, which really ties it
together.

Have a go at cutting your own snowflake and popping it into your album
like I have done. Click here to learn how to make one

To make a bit more room, I have created a little pocket by cutting a slit
into one of the album pockets with a craft knife. I can pop bits
and pieces in there down the track.

Day10
Patterned paper, glitter cardstock, sequins
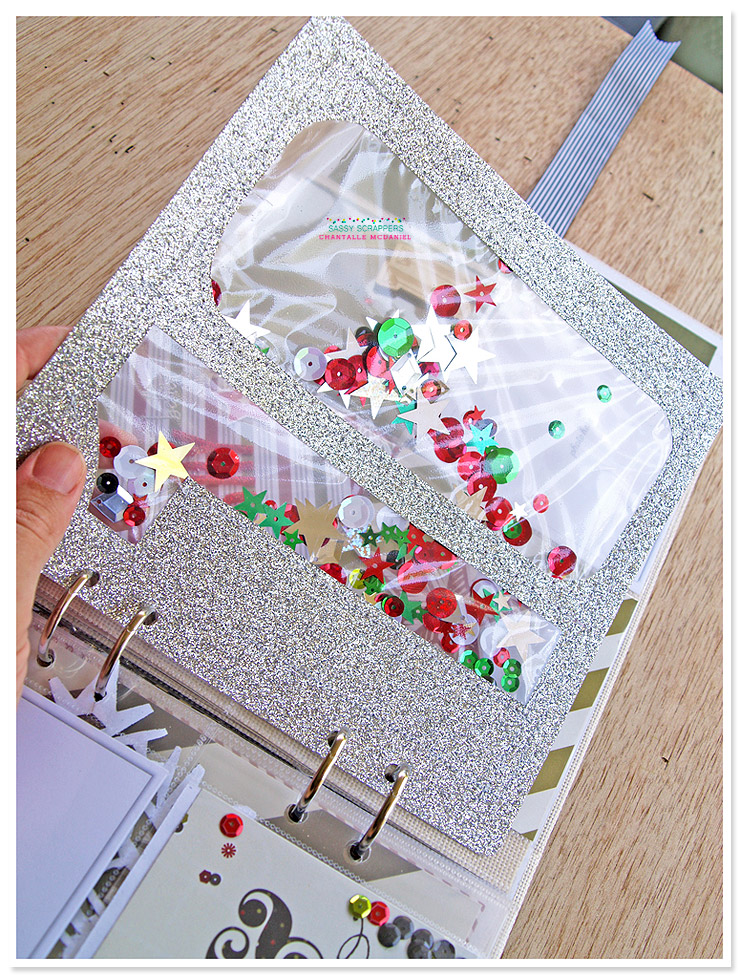
To me, Christmas time means all things sparkly and I so love a good shaker pocket!

Here's how to make your own page divider shaker:
1. Trim your sheet of glitter cardstock down to 8x8 inches.
**Remember to reserve the strips for use further in the month!**
2. Next, using a lead pencil, trace the number you want to use on the reverse side, in reverse. You can do this by eye or maybe print off
some large numbers to use as a stencil.
3. Using a craft knife, cut out the numbers.

4. Next, I have used a basic A4 plastic sleeve that I'm sure you have lying around at home somewhere, and filled it with some sequins.
5. Laying the sleeve underneith the cut number divider, sort of squish them around until you are happy with the distribution inside the sleeve.
5. Now, using a sewing machine, stitch around the outline of the numbers. You can go over quite a few times as the stitching doesn't show up too much. I'll admit mine could've been a bit neater, but I'll just go with it ;)
6. Once you finished sewing, trim off excess thread and trim off the excess plastic sleeve around the edges

I love how it catches the light. So festive!
Day11
Patterned paper, number, ephemera,alphas

Fold over a 3x4 Sn@p card to create a bit of interest with a lift-the-flap

Day12
Patterned paper, number, ephemera, doily
This has turned out to be one my favourite spreads so far!

I created this cluster by cutting a large circle out of patterened paper
and popping a circular die cut on top. The leaf die is a Couture Creations one
I have at home, but you could use some ribbon, tinsel or hand cut some
shapes like feathers and stitch them down.
and popping a circular die cut on top. The leaf die is a Couture Creations one
I have at home, but you could use some ribbon, tinsel or hand cut some
shapes like feathers and stitch them down.

Day13
Patterned paper, number, ephemera, mini word stickers
Very simple page. Have some fun by adding lots of little words that have significance to your festive period on one of the 4x4 pieces of paper. Punch one of the cards in the ephemera pack and add it on its own on top of the album sleeve.

Day14
Patterned paper, number, ephemera
Another one that I love. The acrylic page dividers are just so awesome!

I have created another stitched banner using the banner technique from my
Part 1 post, with the large triangles from the ephemera pack. Create a cluster with different elements from the pack.

Day15
Patterned paper, paper clip, ribbon, Sn@p card, Merry & Bright stickers, glitter cardstock
Hand stitch your number for wow factor!

How to create this fun stitched page divider:
1. Use one of your page dividers that we have already prepared last week
(A 12x12 trimmed to 8x8)
2. Using a lead pencil, draw the number you wish to use on top.
1. Use one of your page dividers that we have already prepared last week
(A 12x12 trimmed to 8x8)
2. Using a lead pencil, draw the number you wish to use on top.
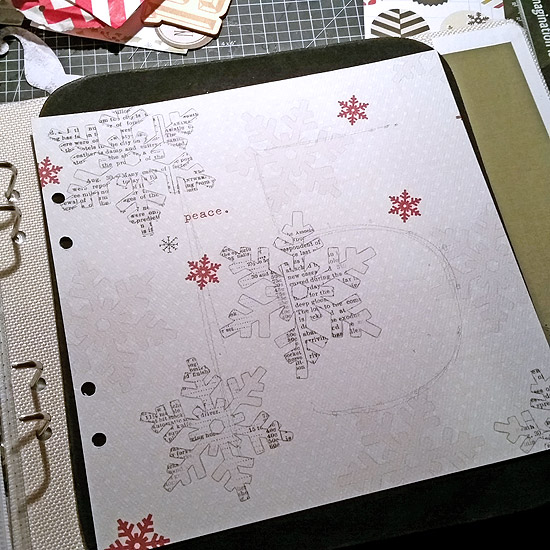
3. Using a paper piercer, or a large needle or pin, pierce the papers at regular intervals along the pencil lines. (see arrows below) Once you have pierced all the holes, erase the lines with an eraser.
4. Now, thread a thin ribbon (you could also use twine) and backstitch all along the numbers, using your holes as guides.

The final product is very striking! Embellish very simply to really make it stand out.

Day16
Number, glitter stickers, alphas, journalling spots
A banner style heading and a photobooth place holder for later.
TIP: Attach your journalling and other bits to your binder
TIP: Attach your journalling and other bits to your binder

You can see I have given my number a bit of a dazzling!
Here's how:
1. Go over your wood veneer number with some silver paint, a paint marker (what I have used) or some mist

2. Once dry, go over the debossed area with some silver
Stickles or similar glitter glue

Ta da! Looks fantastic doesn't it!

Thanks again for stopping by. I hope I have given you some ideas to get you excited about starting your album!
Join me again next week, when we look at days 17 till 25.
Till then!
Chantalle


.jpg)
.jpg)
.jpg)
.jpg)



.jpg)
.jpg)
.jpg)
.jpg)


 Posts
Posts


